“Selecting the pattern that is right for you is the first step in making a garment. It is one thing to find a picture in a pattern book that you like. It is quite another thing to be sure the design will be most becoming to you, in the material you have chosen, after you have spent time and energy to make the garment.” – Pattern Selection and Alteration Circular, 1951.
When you select a pattern, consider these points:
- Are the lines in the pattern suitable to your figure type? Do they emphasize your good points and minimize any figure problems you may have?
- Is the pattern suitable for the fabric you plan to use?
- Is the pattern suited to your sewing ability? Your chances for success are good if you choose a simple attractive design. Avoid elaborate or complicated construction features, such as scallops, use of material on the bias, unusual seam lines, many pleats, godets, and unusual closings until you have had considerable sewing experience.
Pattern Proportions Differ
While all commercial pattern companies use the same standard measurements provided by the Bureau of Standards of the United States Department of Commerce, they vary the amounts of ease added and differ in shoulder width and slant, and in the shape of the armscye and sleeve cap. Because of this, various makes of patterns or the same pattern in different years may have different proportions, and you may find some makes of patterns fit your figure better than others.
Know the Type of Pattern to Buy
By comparing your measurements with those given on the pattern envelope, you can tell which type of pattern is best for you. In recent years, patterns have been developed in several types: girls’, teen-age, junior, misses’ women’s, women’s half sizes, women’s larger sizes. Differences are mainly in lengthwise measurements, making the proportion different, as well as difference in girth measurements.
What Size Pattern to Buy?
Buy your pattern in the size nearest your bust measurement. If alterations are necessary, it is easier to alter the waist and hips. Consider your figure before you buy a patterns. If you are between sizes, as for example a 35 (bust in inches), and if your figure is round and low-busted, size 34 (bust in inches) will probably fit better. If your figure is broad-shouldered, and flatter, the larger size will be better.
Did you know?
When new designs were created by a pattern manufacturer, it was first developed in size 36, for a figure five feet six inches tall, and measuring 36 inches in the bust, 39 inches in the hip, 30 inches in the waist, and 15 inches in width of back. Other sizes were graded up and down and sewn from this master pattern.
Take Your Measurements
Measurements usually given on most pattern envelopes are those for bust, waist, and hip. Some patterns also give the finished length, back of shoulder width, and sleeve length. Take measurements suggested and compare with the measurements listed on the pattern envelope. Then buy the pattern nearest your size. Take your measurements with a firm, accurate tape measure, close but not right over a good foundation garment. Stand erectly but naturally, with your weight on both feet and your toes pointing straight ahead.
Wrap a flexible tape measure snugly around your waistline (or where you wish it to be), lowering it slightly (about ½-inch) in the front if you have a large abdomen to give a more slender appearance. Do not bend or move to change the location of the tape measure once it is around your waistline.
If you have a large abdomen, you will find it helpful to check your measurements about 3½ to 4 inches below the waistline with the measurement of the pattern. It is at this point that the skirt often needs to be made larger.
To keep the side seams in their proper position, check the waist and abdomen measurements from center front to side and center back to side. Side seams correctly places should fall in a plumb line from tip of shoulder to center of arch of foot. Pattern adjustments can then be made more easily to conform to differences of front and back of figure.
Many women and girls can buy a pattern in the correct bust measure and have the garment fit very well. Many others, whose proportions do not correspond with those of the patterns, need to alter each pattern piece to their own measurements. Have someone take your measurements and record them for you. It is difficult to take your own measurements.
Record Your Measurements

____ 1. Bust. Measure from the back, over fullest part of bust, about 3 inches below armhole and parallel to the floor; or take your chest measurement close under your arms, and add 2 inches.
____ 2. Waist. Measure with the tapeline around your waist.
___ 3. Hip. Measure over fullest part, about 7 to 9 inches below waistline, and parallel to floor.
___ 4. Center Front and Center Back to Side Measurements. Locate a point straight down from the bone at each end of shoulder and in line with the center of the arch of the foot. Measure at waist and abdomen from center front and back to this line.
- Waist – center front to side
- Waist – center back to side
- Abdomen – center front to side
- Abdomen – center back to side
___ 5. Front Waist Length (Same as [6])
___ 6. Back Waist Length. Measure from highest point of shoulder at neck to waistline.
___ 7. Underarm Waist Length. If you are extremely short of long waisted, measure from underarm (1 inch below where the arm joins the body) to the waistline.
___ 8. Width of Back. Measure across width of back, about 4 inches below bones at end of shoulders.
___ 9. Sleeve Length. Bend arm slightly at elbow and measure from bone at end of shoulder to the point of the elbow. Continue the measurements to second wrinkle at wrist on the little finder side of your hand, at the point where your wrist bends.

___ 10. Skirt Length. Decide on a becoming length, in keeping with present styles, and measure from fullest part of the figure, center front or back, from waistline to desired length.
Add For Ease
Patterns have been designed to include a certain amount of “ease” at different locations on the body to insure comfort and a becoming garment. When measuring patterns, be sure to take this “ease” into account – the pattern measurements should be larger than the actual body measures. You can find the amount of ease used by the designer of the pattern if you check the difference between the bust and hip measure indicated on the pattern with the actual measurement of the pattern. For example, a pattern for a 34 inch bust actually measured 40½ inches at the bustline. The 6½ inches’ difference was the amount the designer felt was right for that particular style.
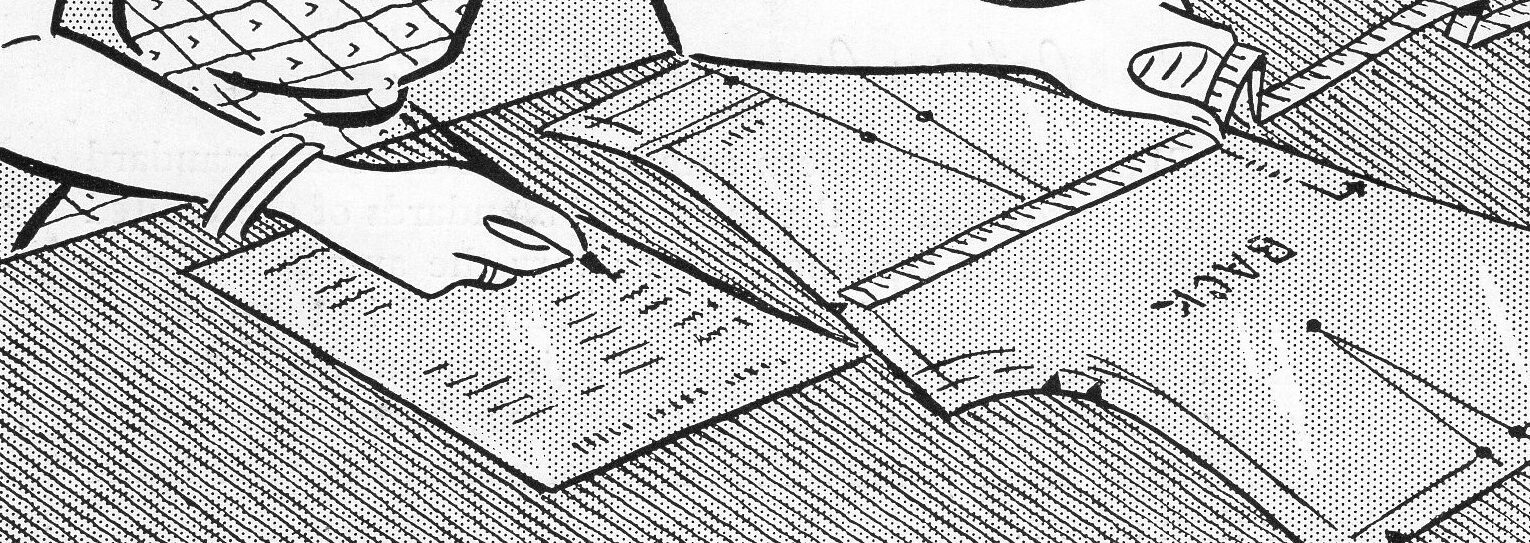
Check Your Pattern

Check your pattern carefully before you alter it. Place your tape measure across the pattern in the same place you took each measurement, always measuring between seam lines and center front and back lines. Fold your tape measure to double the measurement, if each pattern piece is one-half the front or back. Be sure to measure across all pieces if there is more than one. If there is fullness in the form of gathers or released darts at the shoulder or waistline, allow 2 to 3 inches more than the figure in the right-hand column below (I included a chart at the end of this article). Do not measure across darts or pleats, but measure to one side of a dart or the fold line of the pleat, then move tape measure across to the other side of the marking and continue measuring. If your pattern checks within one-half inch of the right-hand column figure below, you do not need to alter. If the difference is more than a half-inch, write in the difference across the pattern in the direction the measurement was checked, with a plus sign for the amount to be added or a minus sign for amount to be taken out.
When You Alter Your Pattern
As you make needed alterations, here are things to keep in mind:
- Always trace your pattern onto tissue paper or tracing cloth before you make alterations. NEVER alter a vintage pattern!
- Draw straight lines on pattern pieces as guides for cutting or folding where alterations are to be made. Use a ruler to draw these lines at right angles or parallel to the straight-of-goods marking on the pattern.
- If the alteration is not needed across the entire pattern piece, cut or fold to about 1 inch of opposite pattern edge so that it will lie flat.
- Be very careful to keep the original shape of neckline, shoulder and armscye.
- Pattern alterations of more than 1/2 or 5/8-inch should be made within the body of the pattern. Alterations less than 1/2-inch may be made at the pattern edge.
- Do not cover needed perforations or markings.
- To keep the placing of shoulder darts or waistline fullness in the correct position, it may be necessary to make two alterations using one-half the amount on each side of the marking.
- When altering, check all pieces needing the same change.
- When alterations cause unevenness or jogs along the cutting edges of the pattern, correct these lines by tapering the cutting line gradually from the widest part back to the cutting line.

1a. To lengthen blouse skirt: Slash blouse pattern a few inches above waistline and spread amount necessary. Pin (or use tape) to paper. Slash skirt pattern midway between waist and hem and spread half the amount needed, pinning to paper. Add other half at hemline.
1b. To shorten blouse skirt: Make tucks straight across pattern as shown. On the skirt, take up half the necessary amount in the tuck, take off other half at hemline.

2a. To lengthen sleeve: Slash across pattern above and below the elbow markings (small •• perforations). Spread necessary amount and pin to paper to hold position.
2b. To shorten sleeve: Make a tuck across pattern above and below elbow.

3. Altering trousers and slacks: to shorten, make tucks across pattern above the crotch and at the knee. To lengthen, slash across at these points; spread necessary amount and tape to paper, same as 1a.
4. Circular skirt: to shorten, cut off desired amount at lower edge. Slash skirt as shown. Pin original hem over lower edge, spreading slash to fit. Retain original waist measure.

5. Collars: If neckline is changed, adjust collar to match. Slash to enlarge. Take a tuck to reduce.

6. For very thin arms: take tucks in sleeve pattern from armhole to bottom. Add to armhole of blouse the amount taken up in sleeve.

For large waistline and large hip: (1) slash pattern from hemline almost to armhole. Spread necessary amount and tape to paper.

For large hips and normal waistline: (2a) Add needed amount at hipline, keeping that amount even to hem. Taper from hipline to nothing at waistline. Or (2b) slash pattern from hemline to waist. Spread necessary amount at hipline and taper to nothing at waistline. Tape to paper.
For large arm: (3a) Pattern should measure about 1½” more than arm – 1″ below armpit. Slash through center, the length of sleeve pattern. Spread needed amount at top and graduate to nothing at wrist. Or (3b) slash through center, the length of sleeve pattern. Spread needed amount below armhole and graduate to nothing at shoulder line and wrist. Form darts to flatten pattern. Restore curve at top of pattern by adding same amount as darts take-up. (3c) Adjust armhole to fit altered sleeve pattern by cutting deeper the same amount as you add to sleeve.

For large abdomen: (a) In a one-piece dress make enough darts at side seam, just above waistline, to allow side seam to hang straight. Add necessary amount at bottom of skirt. (b) In a two-piece garment, add half the amount necessary at front waistline and half at center front of bottom of skirt (indicated by broken lines).

For large hips in back: Compare pattern with your measurements. Slash back-pattern one side of center. A to B. Slash pattern at hipline. C to D. Spread necessary amount and tape to paper. Even up lower edge as shown. On skirt-front take off a little at waistline and add a little at side seam, graduating to nothing at hips.

If skirt hikes up slightly in front: Raise center back until side seam hangs straight.


Heidi
I’m not sure about all the ease. I measure 34-26-35, and when I made a dress from a vintage pattern with those measurements it was way too big. I really don’t see how I need 4 inches of ease in the bust. Since then I have made dresses from patterns with 30″ and 31″ bust sizes and they fit pretty well. I most recently made a dress from a size 15 which is supposed to fit measurements 33-27-36, I graded it down, took two inches off the whole width and also shortened the bodice a little. The finished dress fits with plenty of ease.
SewDecadesAgo
I’m so glad that you found a good and reliable way of fitting your bodices. No one is built the same way, therefore there is no “one size fits all” advice on fitting. This blog post is just a beginner’s look at how to handle fit and trouble shoot common problems.