Making a Civil War Era Linen Bag
I have been admiring pictures of original Civil War Era travelling bags (so different from the carpet bags I’m used to seeing at Civil War reenactments), and finally decided to make one. The one I made is inspired by a common style of bag resembling a modern duffel. The pictures below are of an example I found on line.
I really love the featherstitch embroidery and bias wool tape on the original bag. The handles are adorable, too!
![a80bf0b4229d5141b373b03a0c3c7b75[1]](https://i0.wp.com/www.sewdecadesago.com/wp-content/uploads/2016/02/a80bf0b4229d5141b373b03a0c3c7b751.jpg?resize=300%2C227&ssl=1)
![c999de6a219a3d50beb59a432fbb6dc1[1]](https://i0.wp.com/www.sewdecadesago.com/wp-content/uploads/2016/02/c999de6a219a3d50beb59a432fbb6dc11.jpg?resize=247%2C300&ssl=1)
I chose to make my bag out of a beautiful oatmeal colored herringbone linen fabric which is tightly woven and will make up nicely for this project.
My bag is made out of five pieces: the main body (rectangle 30″ x 21″), two circles (8.5″ diameter), and two handles (10″ x 1.5″).
I also cut cotton lining for the main body and the two sides in the corresponding size. The handles were a double layer of linen fabric.
Next, I cut brown wool fabric (summer weight thickness) on the bias (45 degrees across the straight of grain), 1.5″ wide. This will ensure those perfect circles on the sides of the bag, just like on the original. (Pictured above)

Using a 1.5″ tape maker (one of the best purchases I ever made!), I ironed down the sides, making a nice, half inch wide wool trim.

I marked lines on the main body and the circles for the trim placement and sewed them on by hand. After a quick lesson on featherstitch embroidery, I embroidered lines on both sides of the trim. This took quite a bit of time…
Here are some pictures of the progress:
Side of bag.

Handles. (Back and front). Just like the original handles, mine are bound in bias wool tape, which I sewed to the back first, then to the front.


All the pieces finished with featherstitch embroidery and wool tape.

As an added decoration, and following the pictures of the original, I made piping out of the same bias wool I cut for the tape and sewed it to the edges of my bag circles.

The ends of the main body were folded in and pressed down (they will overlap once the bag in sewn together and will also give me a nice area for future button holes.) The lining of the main body ends within 1.5″ . I sewed it in before I assembled the bag, which will make things much easier later.

Assembling the pieces: The ends of the bag were overlapped and tacked together, then the sides (and their linings) were sewn in the openings. (I kept the lining of the main body out of the way to hand sew it in at the end.)

Buttonholes, sewed by hand and vintage buttons, which I always love to add to my projects.

After I attached buttons, the handles were pinned into place. It took many trials before they were lined up to each other and to the center line of the bag opening. I sewed them to the bag (with an extra layer of linen on the inside to reinforce the stress points. This involved unpicking the lining a bit, so these extra pieces wouldn’t show on the inside). The buttons at the ends of the handles are decorative.

This is what the bag looks like when turned inside out. Originally, I planned on hiding raw edges of the sides of the bag underneath the body lining. This ended up looking bulky and uneven, so instead, I cut strips of cotton lining fabric and bound the raw edges with them. Now the inside has a clean and finished look.

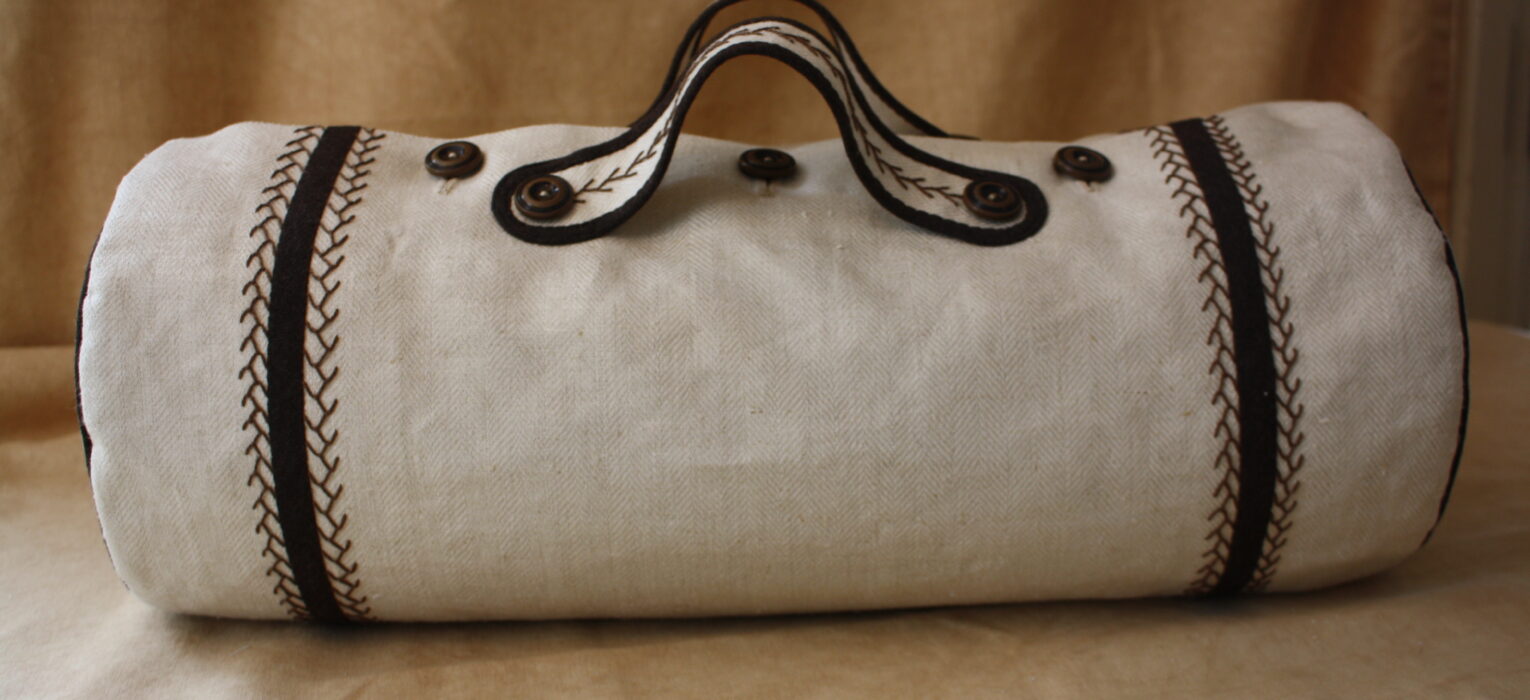
The finished bag:


Fumbling Stitcher
I love this bag. Such beautiful work.
Can’t wait to see more.
AJDecades
Thank you, Fumbling Stitcher! You’re very kind.
Brenda Teply
Your linen bag is lovely. I am looking for a pattern for a Civil War era carpet bag. Do you know where I might find such a pattern? Thanks, Brenda
SewDecadesAgo
Hello Brenda and thank you for your kind words. I do not know of any existing patterns for a carpet bag, but if you would like I can do a tutorial on how to make a simple one with wooden handles. Would you be interested in that kind of blog post?
mary
i am also looking fo a ‘how to’ on travel- carpet bags of the 1860’s style. 🙂
mary of the wv mtns.
SewDecadesAgo
So sorry that it took me this long to respond. I neglected my blog for way too long 🙁 Thank you for visiting and taking the time to write a comment 🙂
Amy
This is just lovely! So neat and compact.
SewDecadesAgo
Thank you so much 🙂